A Step-by-Step Guide to Getting a Dental Crown
A dental crown is a common restorative solution that helps protect and strengthen damaged teeth. By understanding what happens during the treatment process, you can approach it with confidence. The following comprehensive guide explains each stage involved, from the initial evaluation to long-term care.
Understanding dental crowns
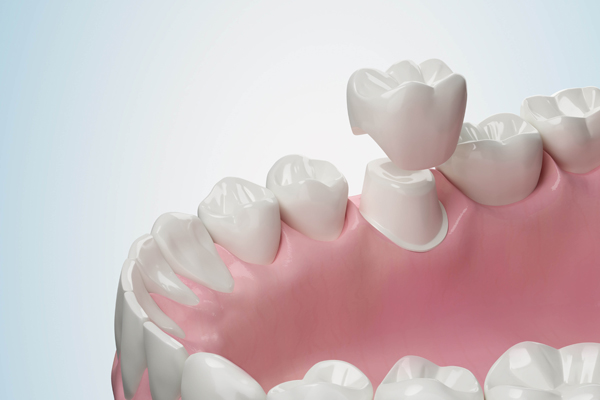
A dental crown is a custom-made cap placed over a tooth to restore its shape, size, strength, and appearance. It fully encases the visible portion of the tooth above the gum line. General dentists often recommend crowns in the following situations:
- Severely decayed teeth
- Fractured teeth
- Previous extensive dental work
- Improve the appearance of the patient's smile
- Support other restorations like bridges
- Abutments for single dental implants
Modern dental crowns are crafted from materials such as porcelain, ceramic, metal alloys, zirconia, or combinations of these. The choice depends on factors including durability, patient preference, and the location of the tooth. For example, the dentist may recommend a porcelain crown for a patient with a damaged front tooth. Meanwhile, they may recommend a metal crown for a molar, as it is less visible and can withstand everyday chewing and biting forces.
A step-by-step guide to dental crown placement
Step 1: Initial examination and diagnosis
The process begins with a comprehensive dental examination. During this visit, the general dentist evaluates the affected tooth and surrounding structures using visual inspection and diagnostic imaging such as X-rays. This step determines whether a dental crown is the most appropriate treatment compared to more conservative methods such as fillings, inlays, and onlays. If the tooth shows signs of severe decay, cracks, or structural weakness, a crown may be recommended to prevent further damage. In severe cases of decay and infection, the dentist may need to perform additional procedures, such as root canal therapy, before crown placement.
Step 2: Tooth preparation
Once the treatment plan is established, the dentist prepares the tooth to receive the crown. During this step in the process, the dental team will reshape the tooth by removing a portion of the outer structure. The goal is to create adequate space for the crown while preserving as much healthy tooth material as possible. That said, if the tooth has damage or decay, the dentist may use filling material to rebuild the core before shaping the tooth.
Step 3: Impressions and shade selection
After preparation, the dental team will take detailed impressions of the damaged tooth and surrounding teeth. These impressions may be captured using traditional dental putty or advanced digital scanning technology. The resulting model serves as the blueprint for creating the custom crown. At this stage, the dentist also selects the appropriate shade to match the natural color of adjacent teeth. This step is particularly important for crowns on visible teeth, as it helps achieve a seamless, natural appearance.
Step 4: Temporary crown placement
While the permanent crown is being fabricated in a dental laboratory, a temporary crown is placed over the prepared tooth. This temporary restoration protects the tooth, maintains proper spacing, and allows normal function during the waiting period. Temporary crowns are typically made from acrylic or composite materials. Although these crowns help the patient maintain everyday dental function, they are not as strong as permanent crowns and require careful handling.
Step 5: Fabricating the permanent crown
The impressions and specifications are sent to a dental laboratory, where skilled technicians craft the permanent dental crown. This process may take one to two weeks, depending on the materials used and the complexity of the case. Additionally, some practices offer same-day crowns using computer-aided design and manufacturing technology. These crowns are designed, milled, and placed in a single visit, eliminating the need for a temporary crown.
Step 6: Final placement and adjustment
Once the permanent crown is ready, the dental team will remove the temporary crown. The dentist will then check the fit, shape, and color of the new crown to ensure accuracy and comfort. They will take time to make adjustments as needed to achieve proper bite alignment. After confirming that the crown fits and is comfortable, the dentist will permanently cement the crown in place.
Step 7: Aftercare and long-term maintenance
After getting a crown, patients will need to take proper care of it to extend its lifespan. These habits will include regular brushing and flossing to help prevent decay at the crown margins. Additionally, keeping up with routine dental checkups allows dental professionals to detect the early signs of issues, such as a loose crown. Avoiding habits such as chewing ice or hard objects can reduce the risk of damage. With the right care, crowns can last decades. providing reliable oral function and contributing to the appearance of the patient's smile.
Get a dental crown in the Irvine area
Understanding each step involved in receiving a dental crown can help clarify what to expect throughout the process. With a well-placed and cared-for dental crown, you can enjoy improved oral health and a confident smile for years to come. Call our Irvine office today to learn more about dental crown placement or to schedule a consultation.
Request an appointment here: https://www.implantdentistirvine.com or call Smile by Design Dental Group at (949) 336-3404 for an appointment in our Irvine office.
Check out what others are saying about our dental services on Yelp: Dental Crowns and Dental Bridges in Irvine, CA.
Related Posts
Getting a dental crown is a seamless procedure that is done in dental offices every day. There are various reasons to get a dental crown, which will play a role in how the process goes. For example, for those getting a crown to finish the tooth replacement process after an implant has been inserted, the…
A dental bridge can replace missing teeth, restore your ability to chew food and improve your appearance and oral health. Depending on the type, a bridge consists of one or two dental crowns (one on either side of the gap) that fit over your existing teeth, two dental implants, or two metal wings and a…
Addressing the space left behind after an extraction is essential, as leaving it untreated can lead to a multitude of functional and aesthetic challenges. A dental bridge is an appliance, one of four types, that effectively addresses each challenge by filling the space, leaving you with a complete and functional smile. This causes a ripple…
Dental bridges close the gap left by missing teeth. Many types of dental bridges are anchored by real teeth, dental crowns, or dental implants. No matter the type, they can effectively restore a patient’s smile and chewing ability. But like any dental restoration, bridges have their pros and cons.Before diving into the pros and cons…